• Skip to main content
  • Skip to primary sidebar
  • Skip to footer

HomeMood

Interior Space Planning

  • About HomeMood
  • Online Interior Design
    • Space Planning
  • Blog
  • Inspiration
  • Contact
  • Facebook
  • Instagram
  • LinkedIn
  • Pinterest

E-Dsign

How to design a master suite with a walk-in-closet?

June 5, 2021 by E-Dsign

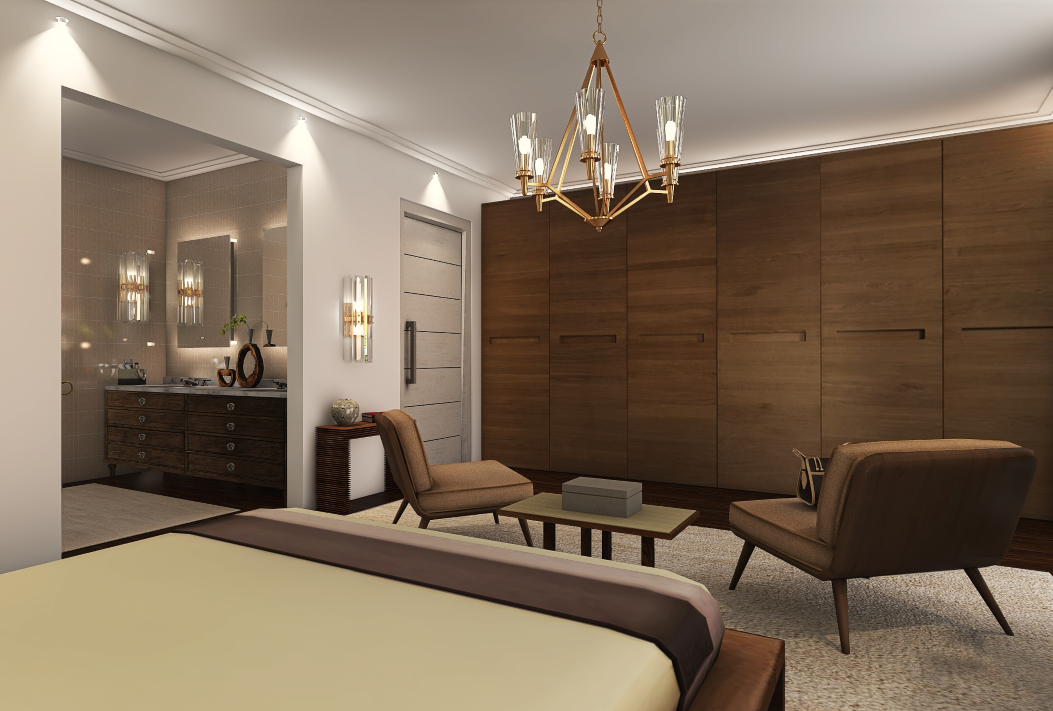
But what is exactly a master suite and why do we dream of it?

A master suite or a bedroom with ensuite, is the combination of a (master) bedroom directly linked to a private bathroom. It may sound like a symbol of the wealth but creating a master suite is nothing fancy. Moreover, it provides the ultimate privacy for the family members, parents, teenagers, or homeowners, for example when they have guests to overnight.

However, having a private bathroom or a walk-in-closet is still associated with the feeling of the ultimate comfort and luxury, and that feeling is exactly we wish to achieve by turning our simple bedroom into a master suite.

But what is needed to make a simple bedroom feels so comfortable and luxurious? Is it the latest interior design trend? The quality of the used materials and finishes? Or the expensive furnishing? Of course, all of these ingredients play their part in the ultimate design, but the most important factor is the spaciousness.


Space is the new luxury!


Placing a 160 x 200 cm double bed in a 7 m² room.
Placing the same 160 x 200 cm double bed in a 14 m² room.

Before starting to design your master suite with a walk-in-closet, the first thing you should do is to create sufficient space for at least 3 functional zones: sleeping, bathing, dressing.

To understand these standard sizes let`s check 3 most common master suite designs and find out where the space planning mistakes have been made.


Which design would you chose as the most optimized one?


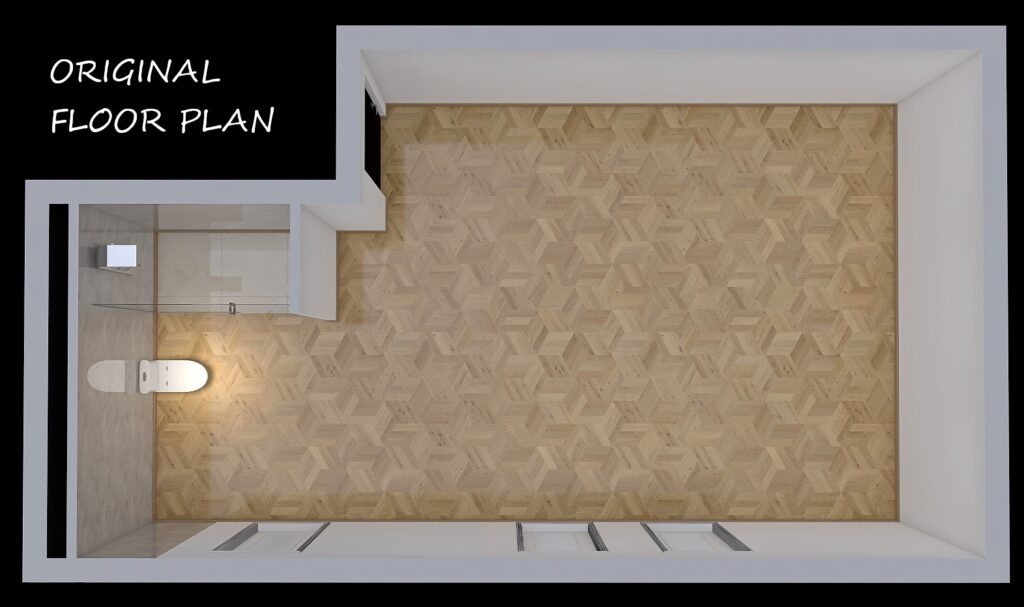
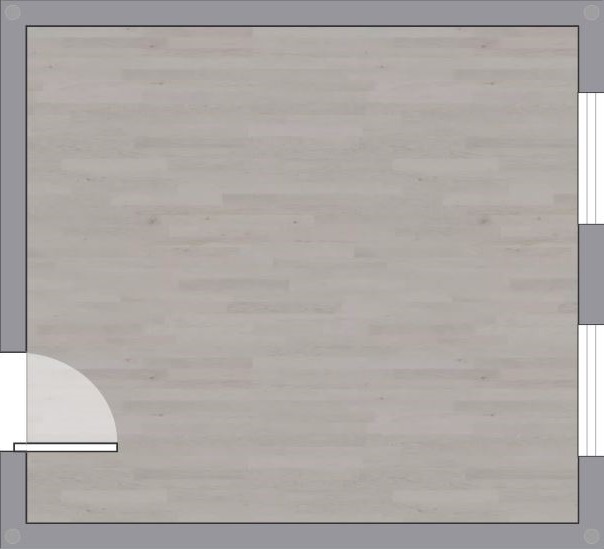
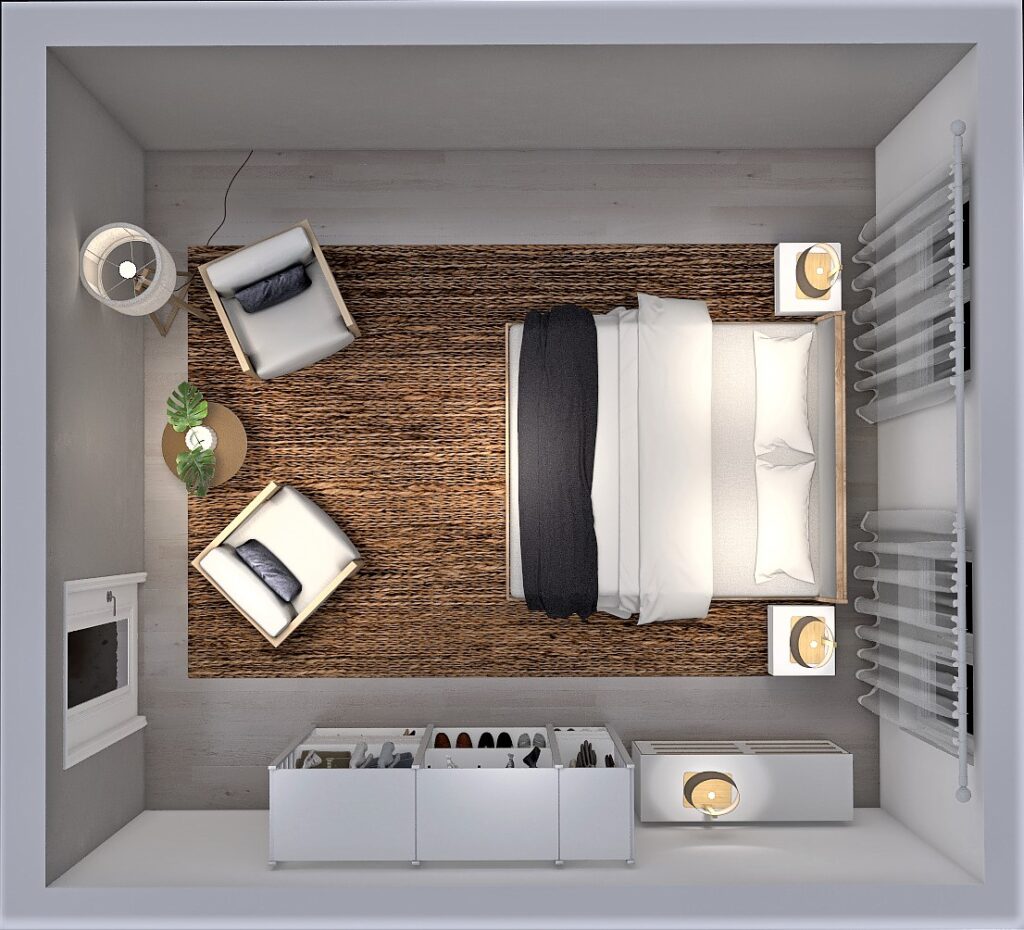
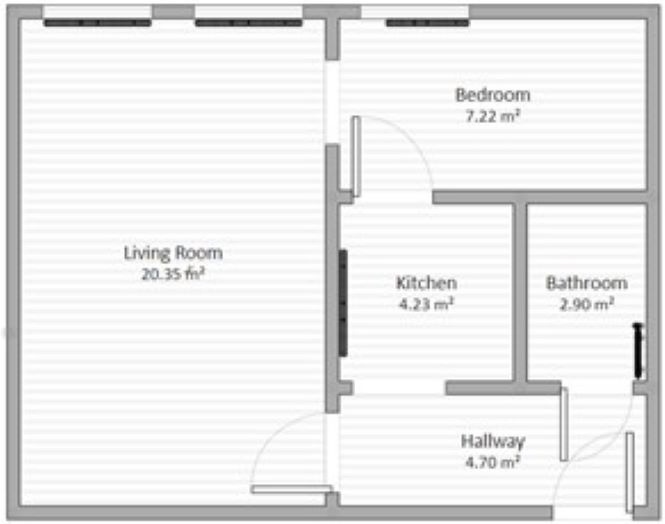
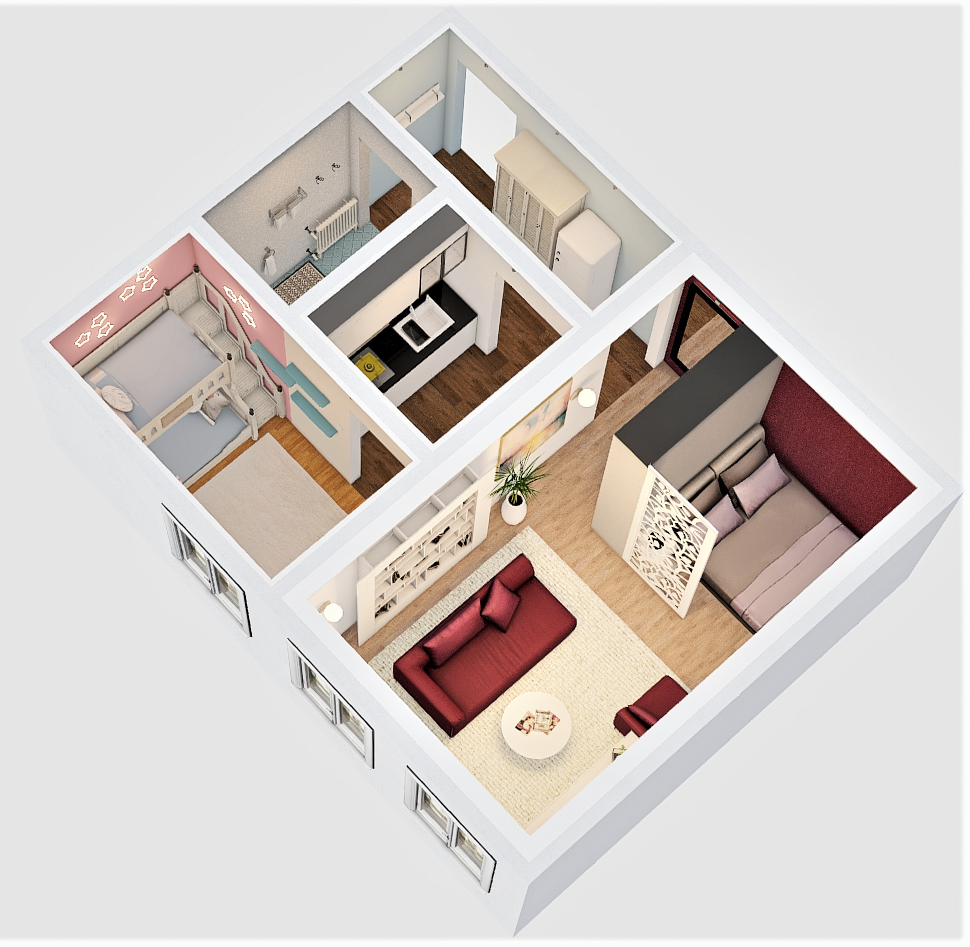
Master Suite Layout – Option 1

Master suite layout – Option 1

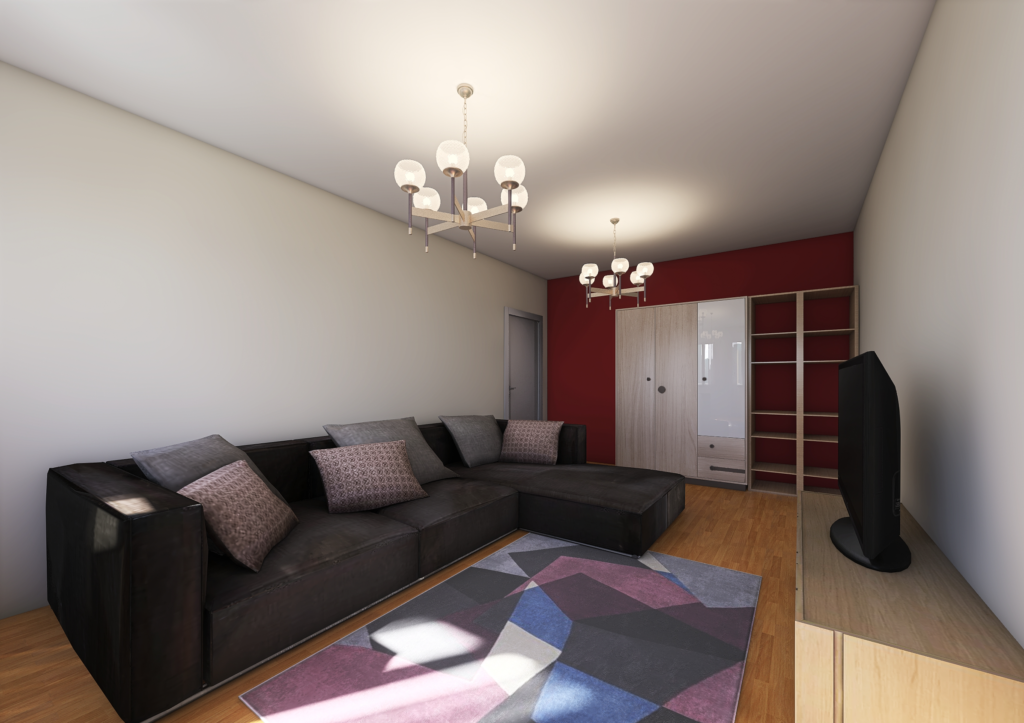
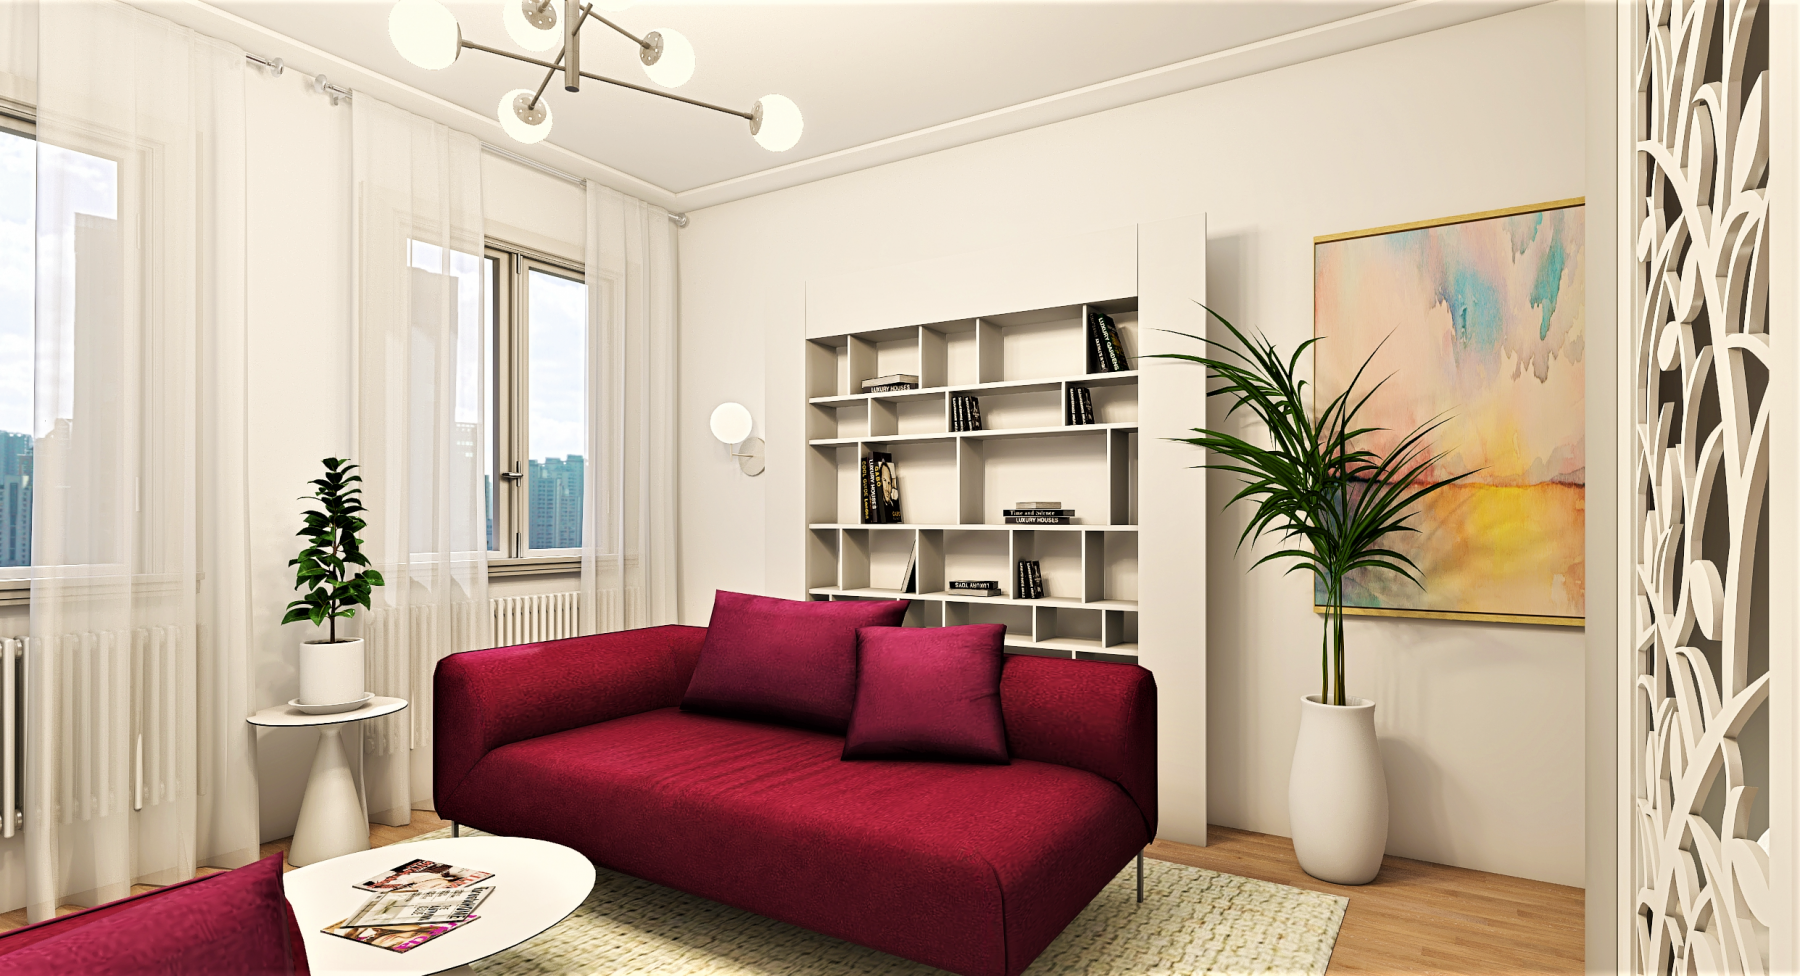
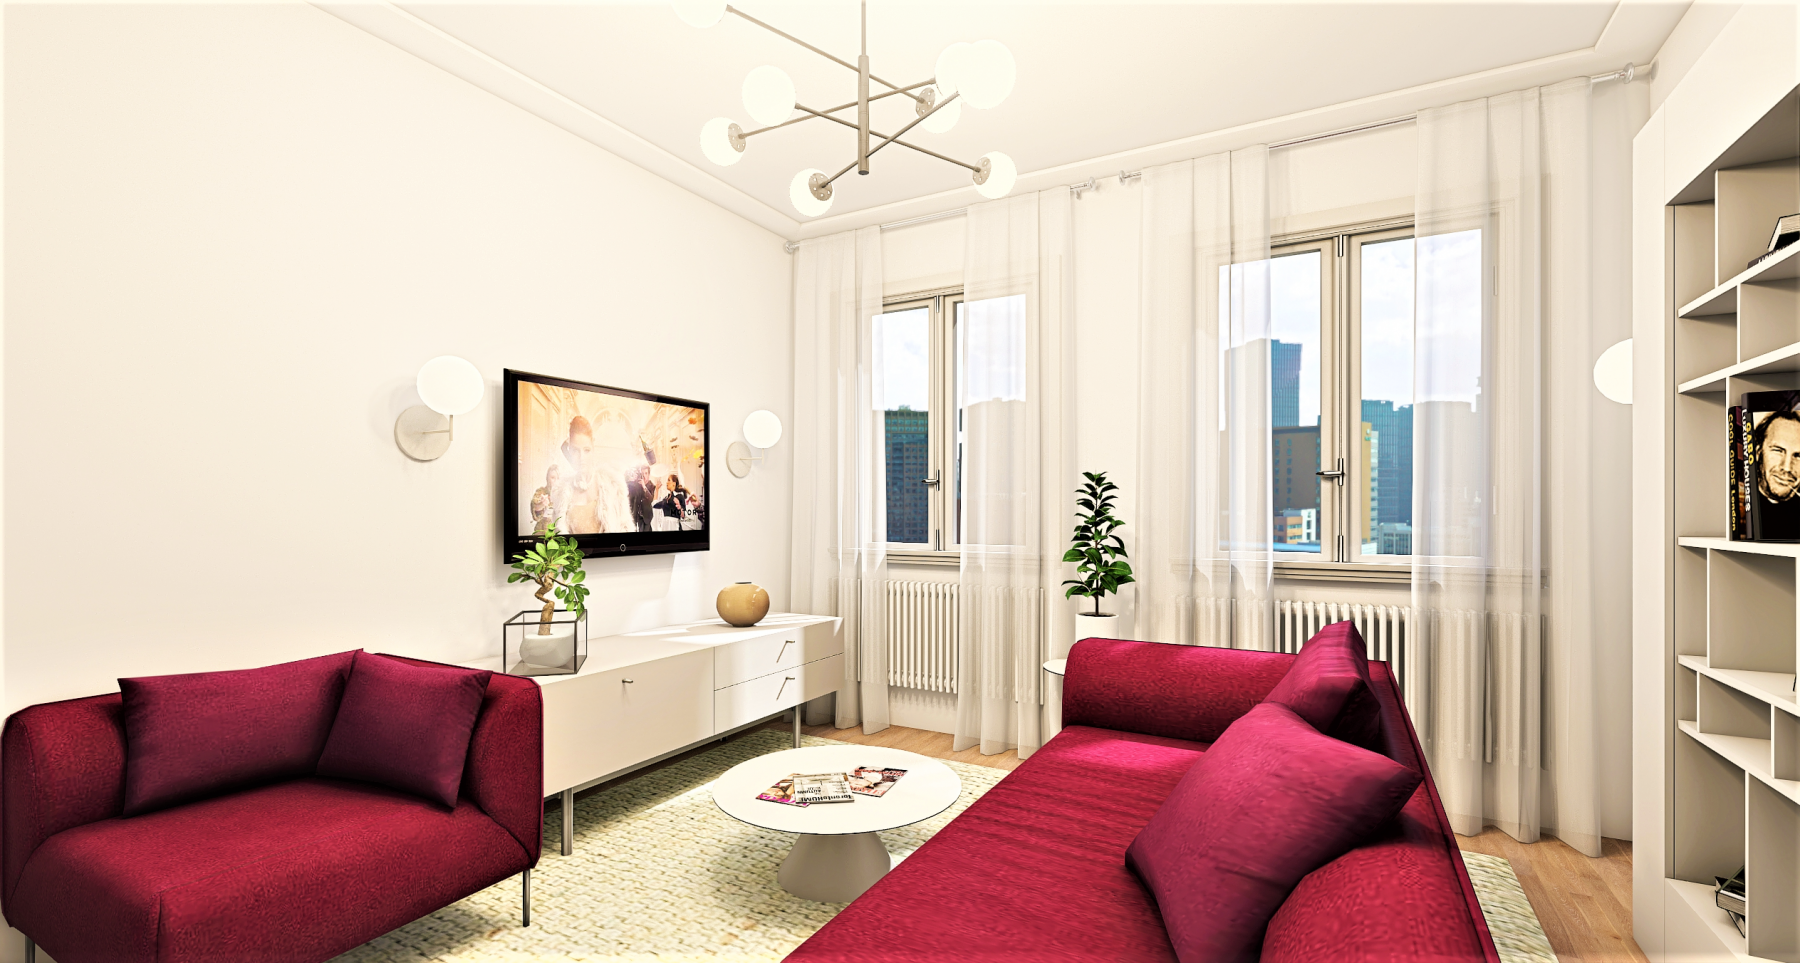
By looking at this design the room looks comfortable and spacious. We have a sleeping area with sufficient light, a good view of the door, a cabinet with television on it and some storage space. There is a walk-in-closet with dressing table and extra chairs for dressing up. At the other end of the room the bathroom is separated with a door from the sleeping zone, and we have a shower, a sink, a toilet, and also enough storage space. Well, what is the problem with it?


Issue Nr. 1: The layout

The main issue with this room is the layout. If we design a master suite with closet, it`s crucial to design the walking path between the functional zones correctly. We have to think about the rush hours in the morning when we are in a hurry, and to consider our daily routine: getting up – having a shower – dressing up and leaving the room. Or conversely in the evening.

In order to avoid unnecessary walking around and between the zones, the bathroom and the walk-in-closet should be placed next to each other.


Issue Nr. 2: Wardrobe positioning

The next problem with this design is how the wardrobes are positioned in the space. That part of the room hasn`t got any sufficient incoming light – especially the dressing table -, so artificial lighting is crucial. The cabinets are placed perpendicular to each other and this way they are not just making the walk through harder but also breaking the flow.  


Issue Nr. 3: Television

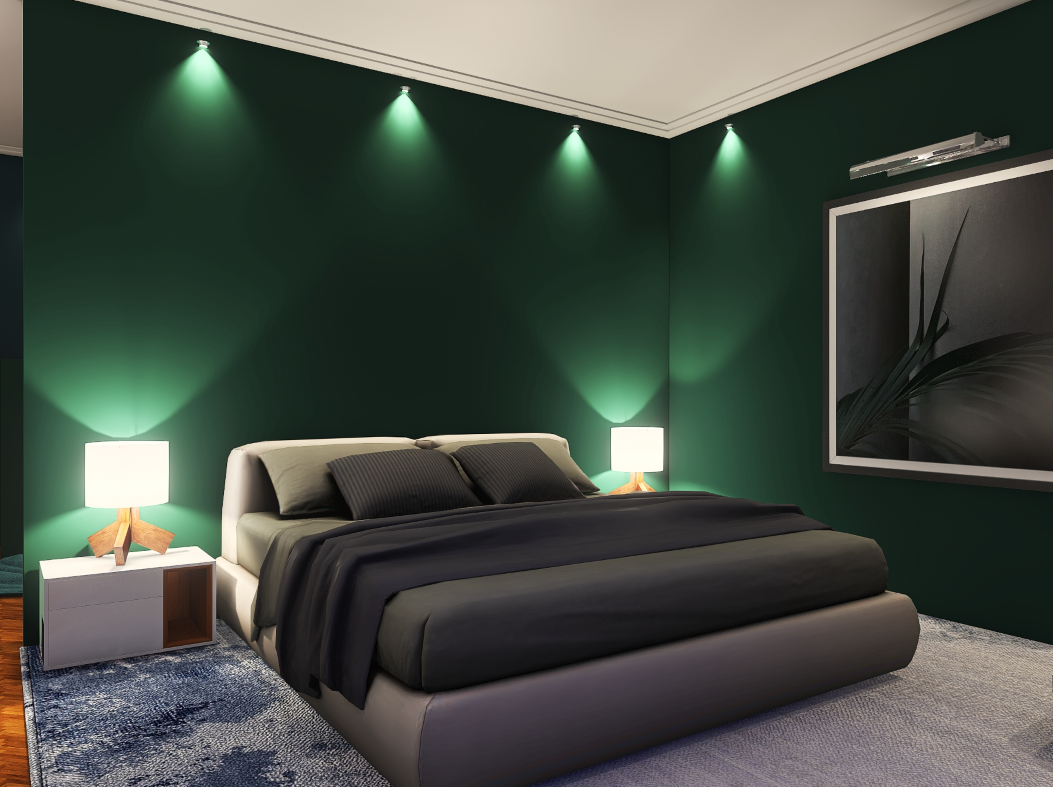
You might think having a television in the bedroom isn`t a problem at all. But from the point of view of well-being, it is. A bedroom is meant for relaxation, peace, and intimacy. Watching television before bed actually disturbs the sleep cycles and it could be keeping you awake at night.


Issue Nr. 4: Bathroom door opens inwards

If you have a door on your bathroom the opening direction should be always outwards. Firstly, because this way you can save valuable space in your bathroom, and secondly but most importantly, if someone gets injured in the bathroom you are still able to open the door and give assistance.


Issue Nr. 5: Insufficient space for toilet

You may have heard the expression: You can never have too much storage. In most of the cases having insufficient storage can ruin a design and therefore we should be using every single cm space effectively. But the overdo can also devastate the design. Even though an additional cabinet fits next to the toilet in this bathroom, we would have to squeeze ourselves between the two cabinets and sacrifice our comfort.


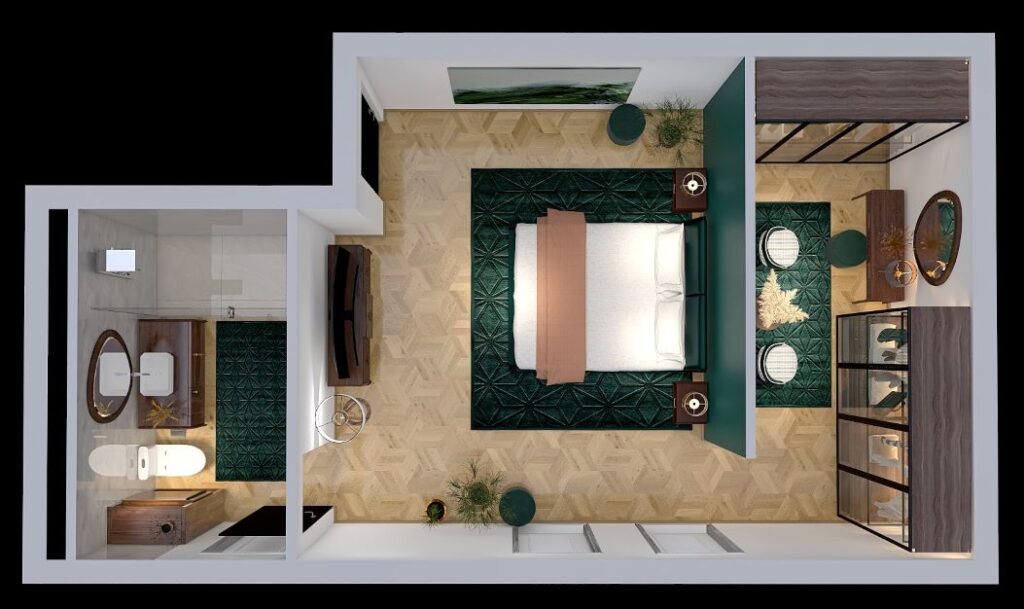
Master Suite Layout – Option 2

Master suite layout – Option 2

Let`s move on and check the second master suite design. Learning from the previous design mistakes, we`ve removed the extra storage unit from the bathroom and this way the toilet can be used comfortably. The bathroom door has also been vanished because we want to save space by not using any door. The dressing zone has been moved next to the bathroom, so we have a more shorter walk path between the bathroom and the walk-in-closet. And as a bonus, both zones have sufficient incoming lights.

It seems like the design is spot on and we`ve made a great work. Hmmm, are you sure?


Issue Nr. 1: Sitting on the throne…

Sometimes everyone needs some privacy, especially when we need to go to the toilet. By this layout, people using the toilet have a great view of the outside world through the window and the inside of the bedroom as well. But people lying in the bed have the same view unwittingly. A pocket door can easily solve this design mistake. But if our aim is to create an open plan layout and to avoid insight in the privacy by not using a door, then the toilet always should be placed out of the visibility.


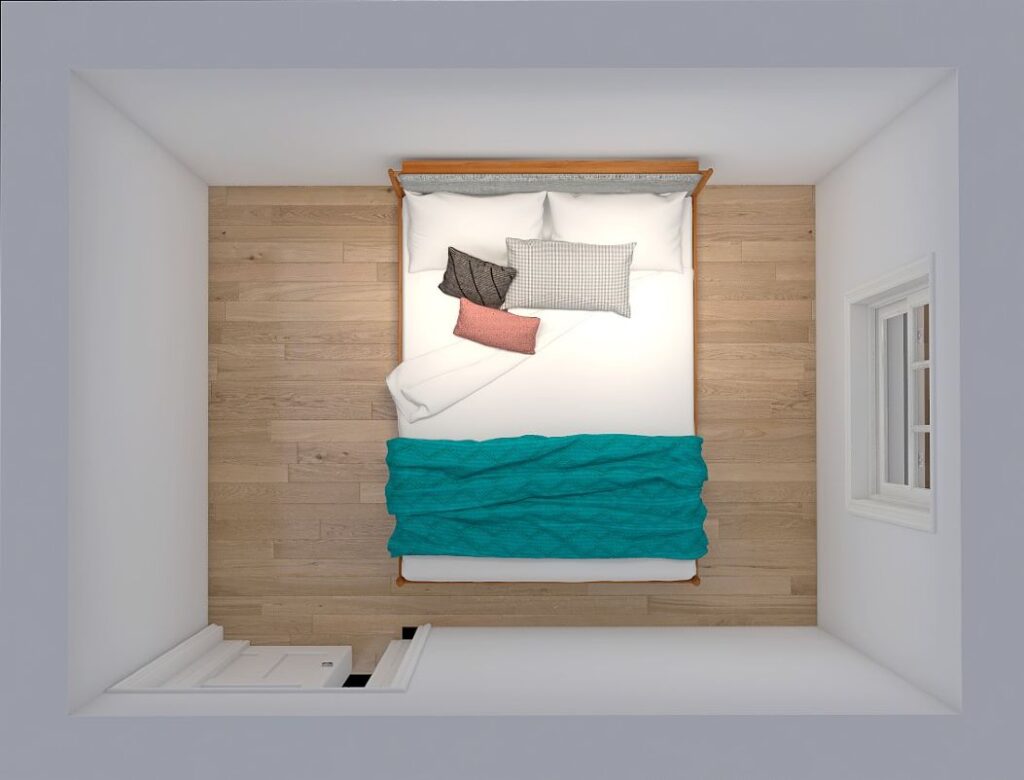
Issue Nr. 2: Bedroom door opening

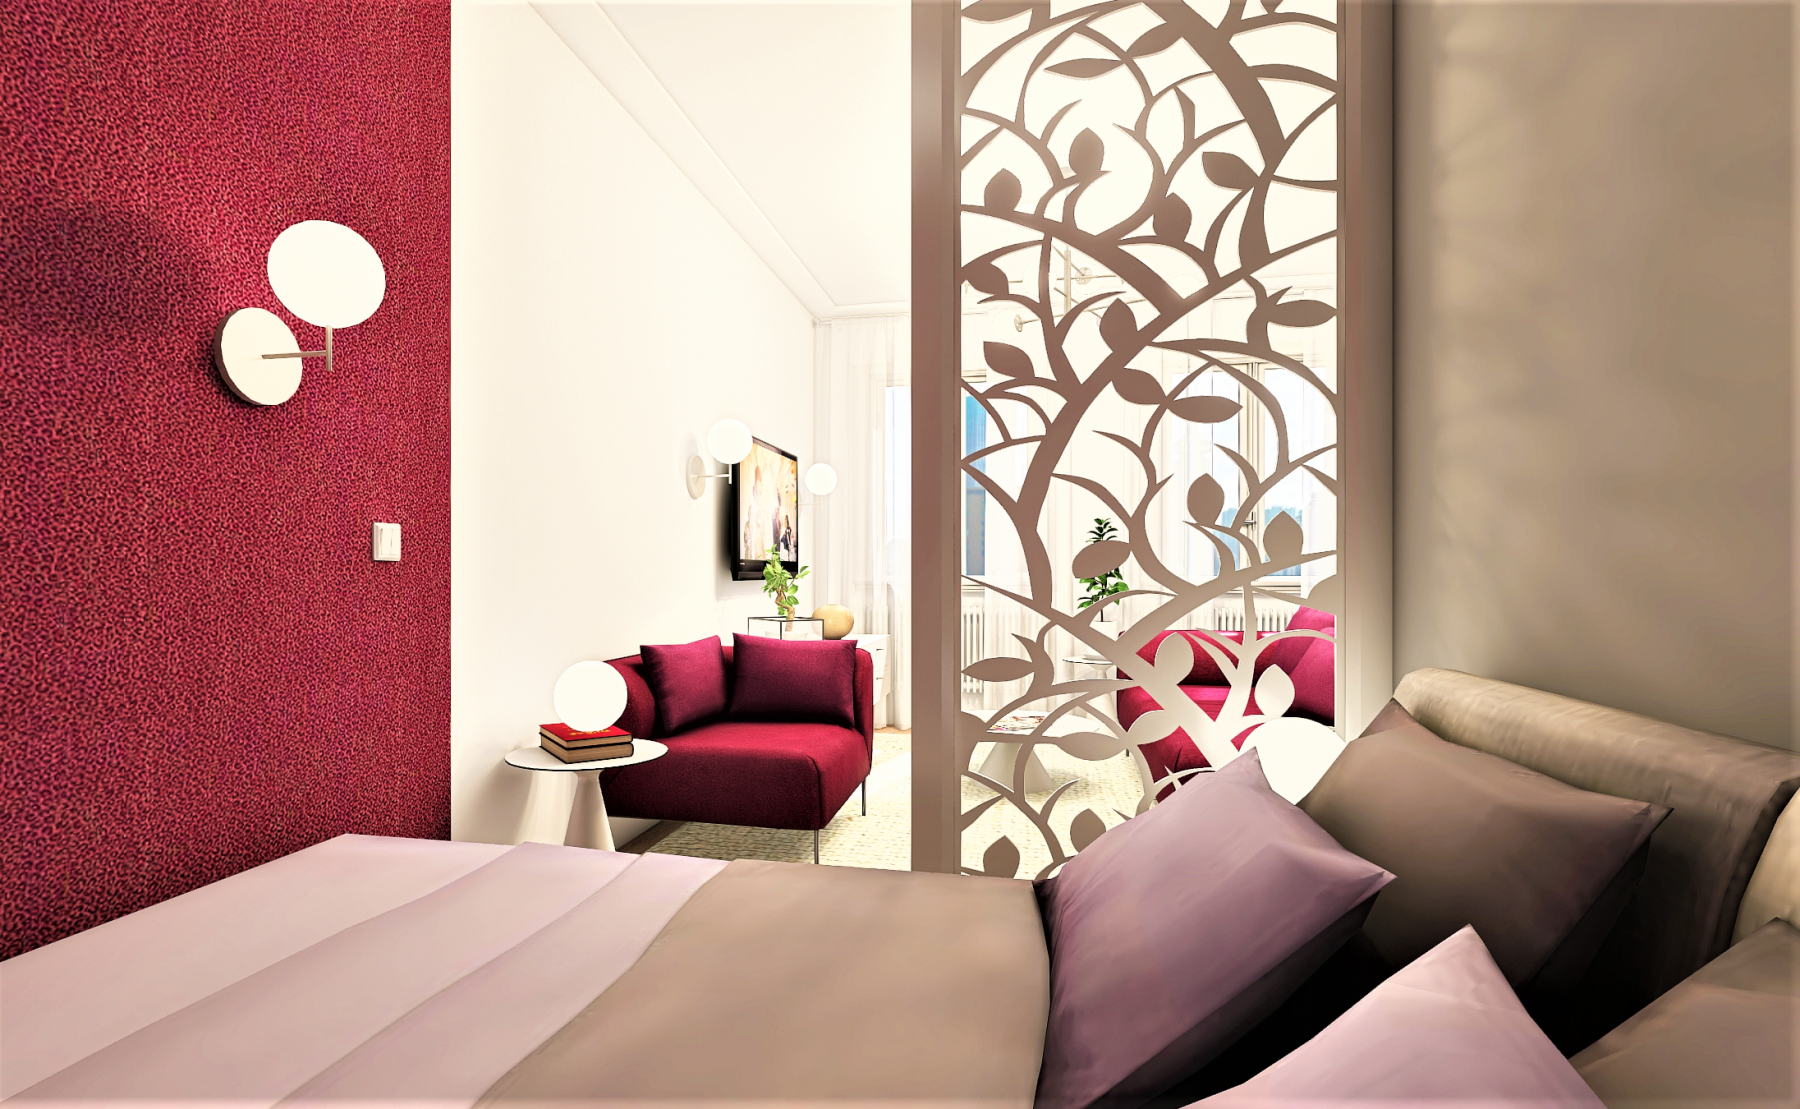
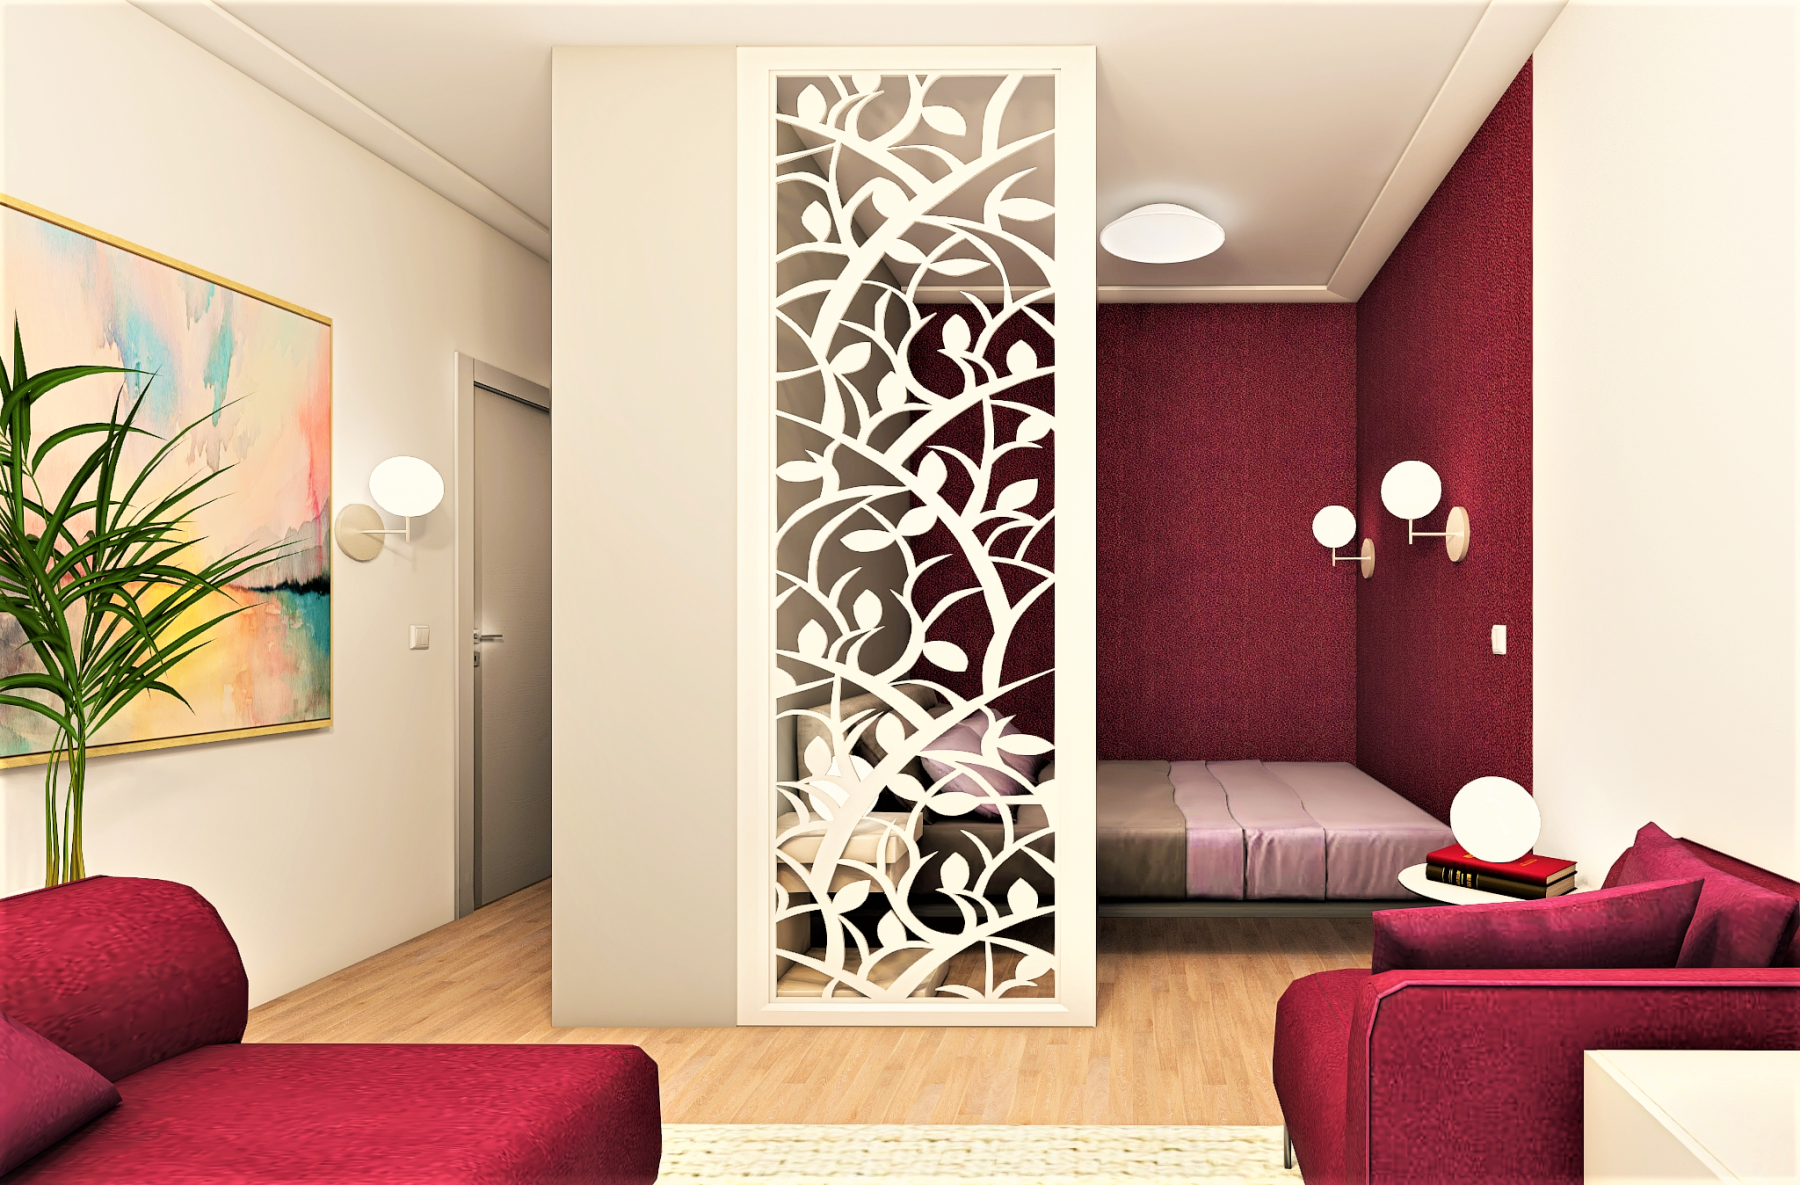
In the earlier topic Where should you position your bed? we`ve talked about how important and determining the direction of the door opening can be by finding the most optimized bed position. The design problem with this bedroom layout is that the door is facing people`s heads. When you lie in bed and the door opening is directly facing your head, it will affect your sleeping quality in the night and can cause headache or any head related illnesses. If you can`t avoid having your bed to be placed in such position, then you can use a room divider between the door and the bed.


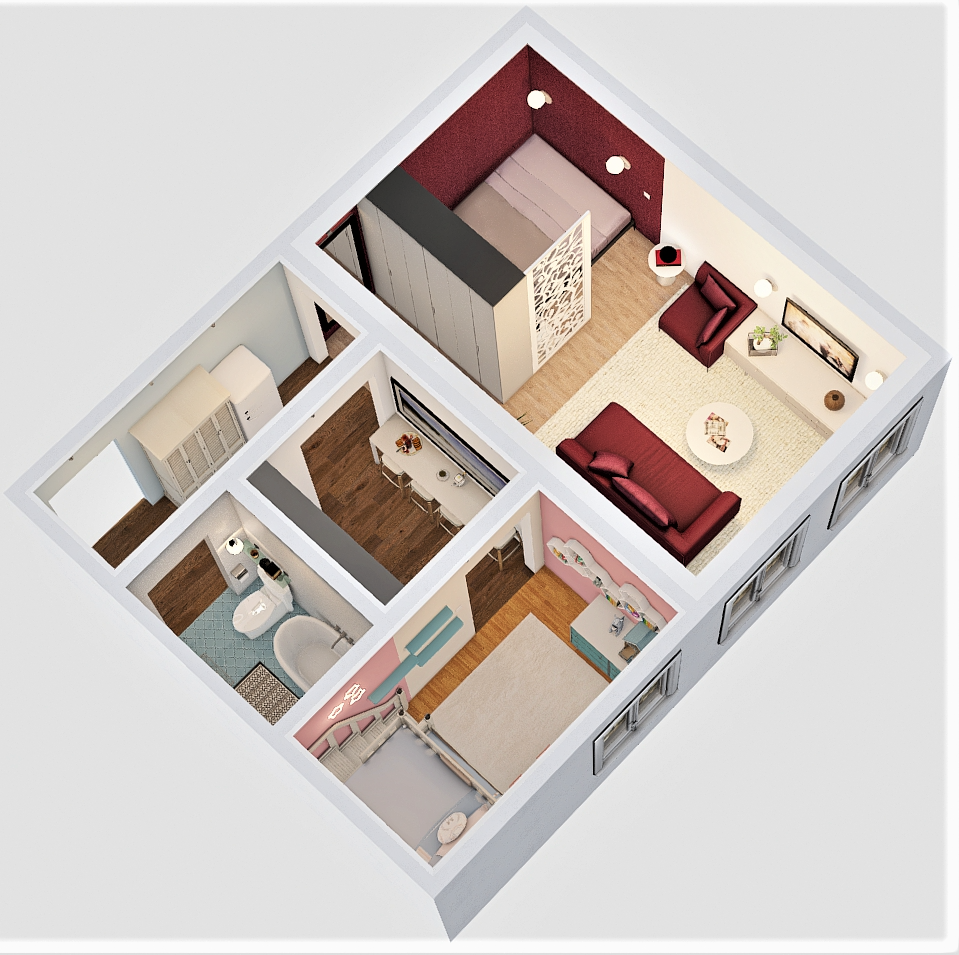
Master Suite Layout – Option 3

Master suite layout – Option 3

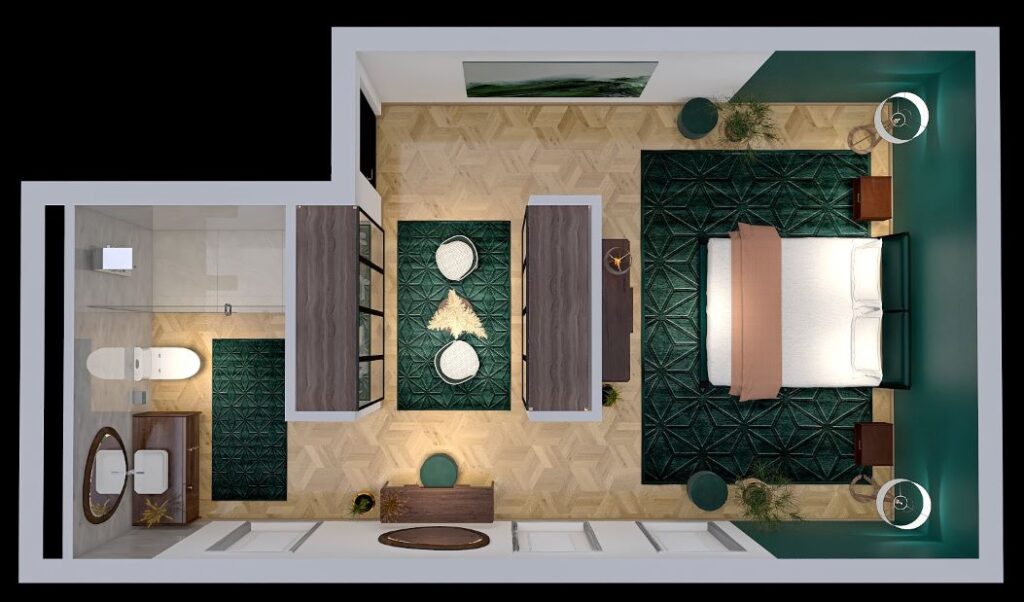
Finally, we`ve arrived at the 3rd master suite design. If you`ve chosen this layout, well done!

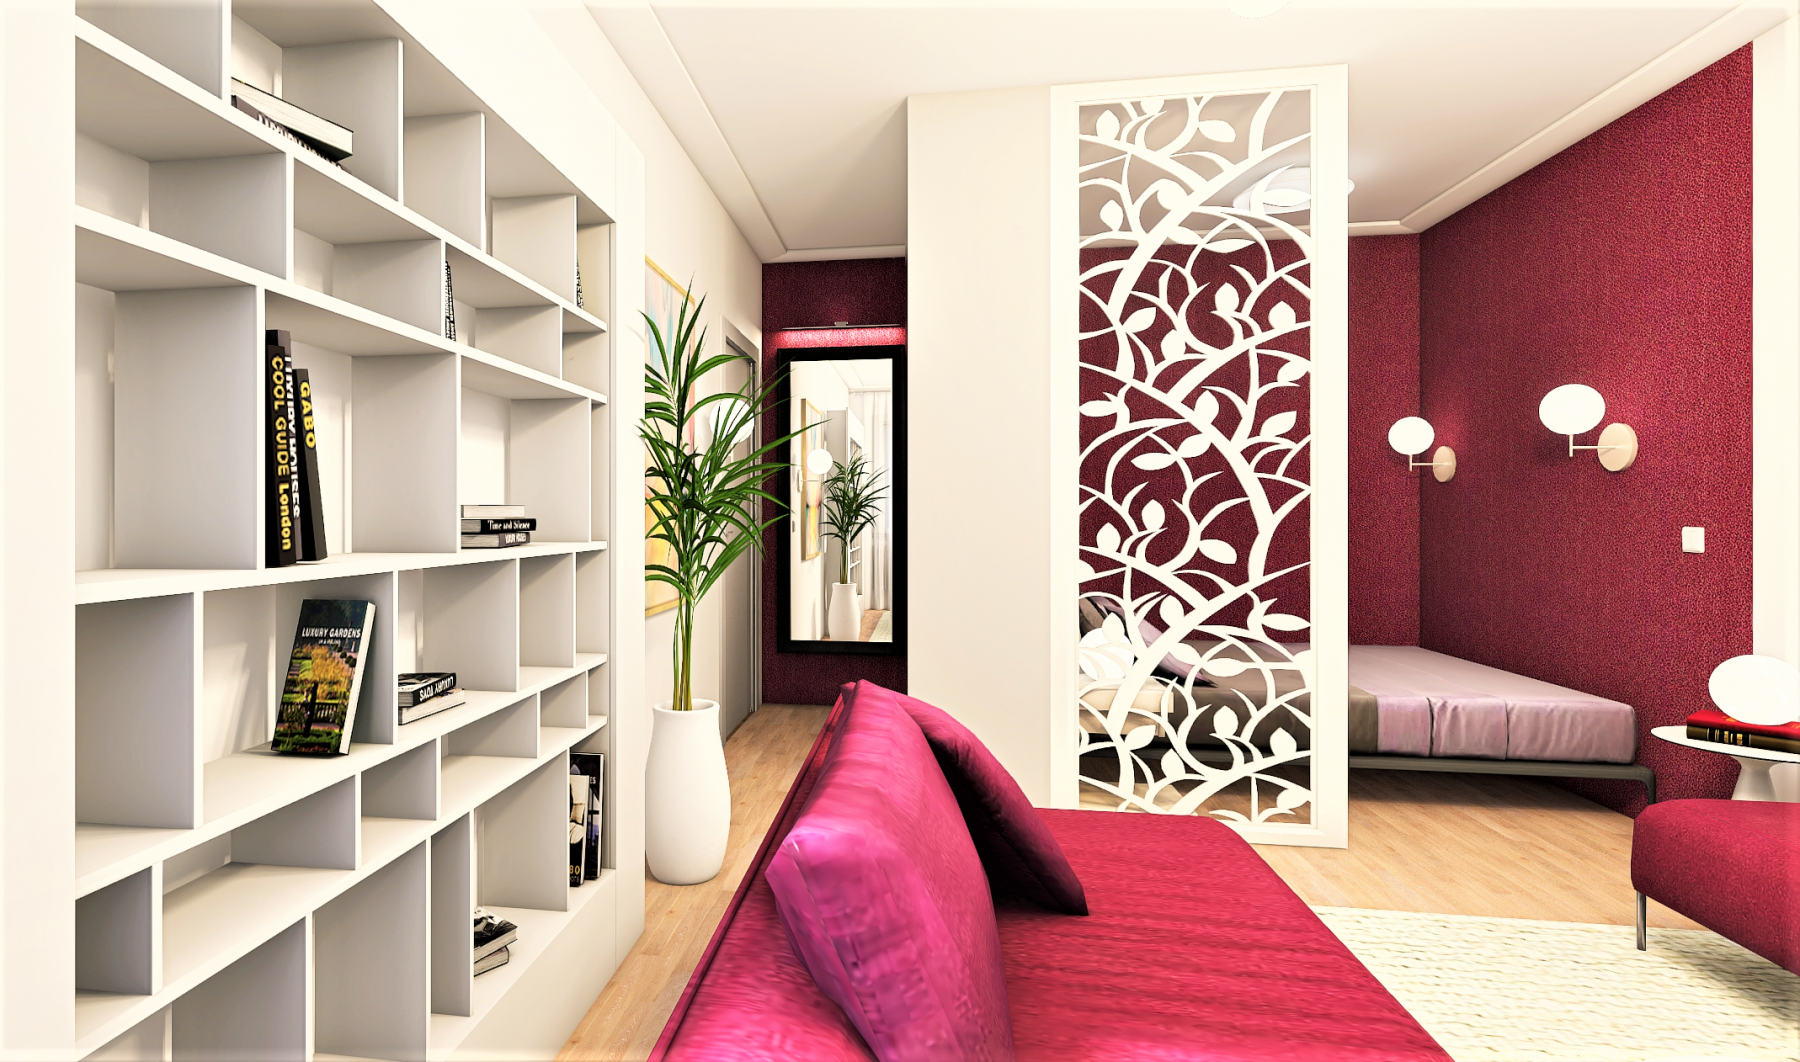
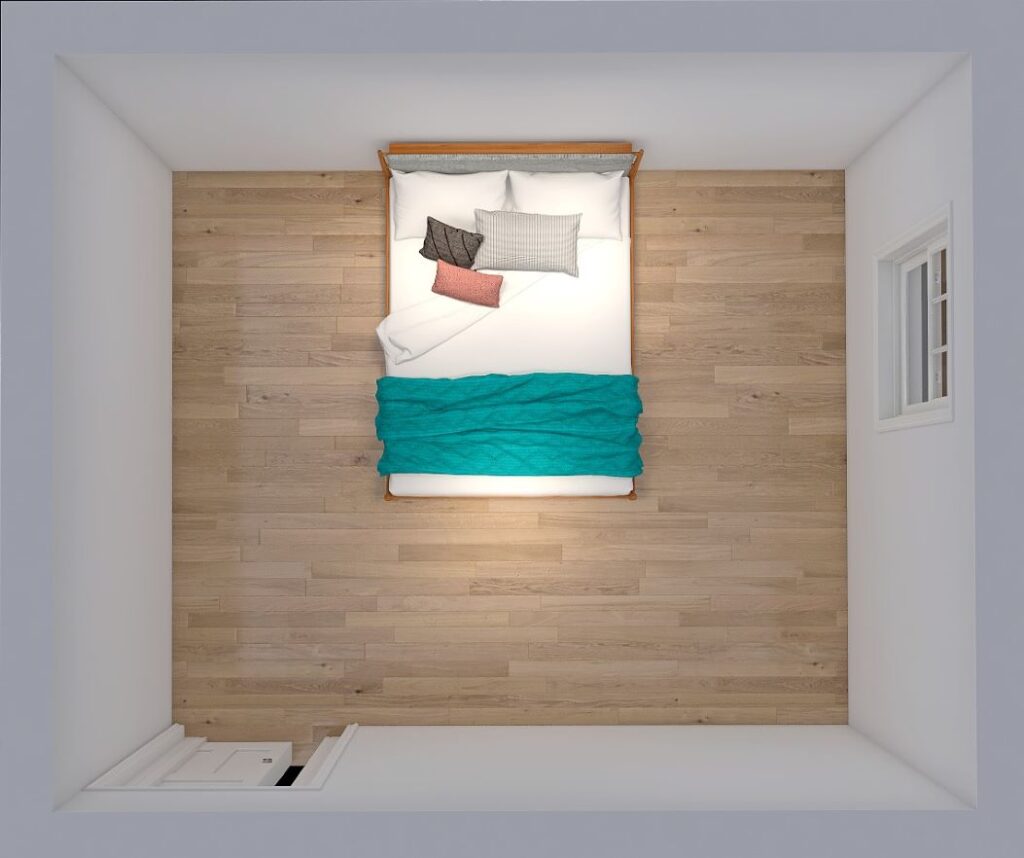
This master suite layout showcases a well-thought-out design for such a multifunctional room. The 3 functional zones are obviously separated from each other, but they are still creating a cohesive whole. The walk path between the zones is clear, which gives the bedroom a good flow without any obstacles in between. The position of the walk-in-closet makes access available from 2 different directions, so you can easily leave the room after dressing up.

In the bathroom, by just replacing the toilet between the shower and the sink, the bedroom`s open plan concept is still achievable and everybody`s privacy is saved.

Through the windows the incoming natural light can fill each part of the master suite and the room looks more spacious and luxurious.


In my next post, the Home Office comes under the magnifying glass and through 3 workspace layout designs I will illustrate the most common design dilemmas and their solutions. I`m really curious if you recognize all the space planning mistakes.


Filed Under: Blog

Where should you position your bed?

May 27, 2021 by E-Dsign

You`ve just finished the renovation of your bedroom. New wall finish, new floor, new window blinds, maybe new furniture. But then the dilemma comes, what`s the best position for the bed…

Bedroom floorplan with windows facing to the East

To help you make the right decision and to avoid making mistakes, I`ve picked the 3 most common bedroom layout designs that people use and I will showcase their advantages and disadvantages.


In this first layout the bed has been placed opposite to the windows with a lovely view for the morning sunrise. Who doesn`t want to wake up to the first warm sunshine’s of a day?

Bedroom layout – Bed next to the door

The room is always filled with natural daylight, you can easily walk around in the room and have sufficient sitting and storage area as well. But where is exactly the focal point and why does it matter?

When we enter a room, our eyes are automatically searching for some focal points for orientation. Focal points are the natural starting positions for a good design. They draw us in, set the mood for a space, and help us to arrange the furnishing around them more functionally.

Furthermore, focal points guide us to find our way in a space or even help to recognize its function. Finding a bathtub in the middle of the room won`t make us think of being in the dining room instead of the bathroom, right?

In a bedroom, the bed is always the most important piece of furniture. Creating a focal point around the bed will catch your attention immediately once you enter the room. But remember, that people from the bed should have a good view of the whole room as well.

By this first layout people have a great view to the outside, the sitting area, and the wardrobe. But they don`t see who is entering the room and that lowers the sense of security.


Then what`s the solution to this problem? Placing the bed underneath the windows?

Bedroom layout – bed underneath the window

Turning the headboards in front of the windows will definitely assure a good view of the door and the rest of the room, but it generates further design mistakes. We are not just blocking the incoming light by placing the bed underneath the window, but we pick a cold wall as backwall for sleeping. Having a bed underneath the window, can create sleeping problems, disturb the sleep quality and we miss the sunrise as well.


Then let`s move the bed towards the longest wall!

Bedroom layout – Bed placed towards the longest wall

Doing so seems that we`ve found the most optimized bed position for this specific room. Great!

The bed will be the focal point of the room, we have a good view of the door, the windows, the wardrobe, and we are still able to walk around between the different zones. Each of the functional areas has sufficient light and the room has a good flow. 

If you`ve chosen this layout, well done!


Of course, you can imagine many other layout options for this single bedroom, but just applying the 3 most common ones, we see how important it is to have our bed placed in its best position and how easy it is to create a functional layout.

For the next time I`m picking a slightly bigger bedroom – with a more challenging layout and space for walk-in-closet and an ensuite –, and I`m really curious if you recognize all of the common space planning mistakes.


Filed Under: Blog

7 Design Rules You Need to Know

March 5, 2021 by E-Dsign

7 Design Rules You Need to Know

Maybe you`ve just bought a new house with a layout that does not fit your lifestyle? Maybe you`re selling a property as an investment but the current layout discourages the potential buyers? Or you need a dedicated space at home for work but not sure where to create it?

Before starting any renovation, removing walls, changing the room layout or the wall colours, it is essential to get to know the characteristics of the living space.

By analyzing the space we are not just able to prevent any design issues but we can also correct the earlier made ones and experience its immediate effect in our life quality.

If you are interested in learning a bit more about some of the indispensable design rules and how to apply them to your room makeover, you can download your free guidance of 7 Design Rules You Need to Know here.

Filed Under: Blog

How to Get More Light into Your Home? -Part 2

November 13, 2020 by E-Dsign

17 Best Ways to Let More Light Entering Your Living Space


How to get more light into your home?

In the previous topic I wrote about the importance of having sufficient daylight in our life and collected some lightening up tricks for your home. As there are so many clever solutions about how to let more light into our home and to make any living space brighter and cosier, for this time I continue with further 9 lightening tricks. If you haven`t read the first part of this topic so far, then you can find the whole article under How to Get More Light into Your Home – Part 1.


9. Curtains

We can lighten up the window area of a room by using curtains and blinds. The more airy, transparent, and light fabric of the curtain is, the more brightening effect you can achieve. Of course, you don`t have to hang on curtains if you`re not fan of them, because leaving the windows free will also let in more light.

1. Dark and heavy curtains blocking the daylight – 2. Light and bright curtains allow more light – 3. Windows without curtains let in the most light

10. Make the window look bigger

The size of the window mainly determines the amount of incoming daylight. Floor to ceiling windows, patio doors or curtain walls allow the most light into the room, while small windows work rather as a light blocker.

If we can`t or don`t want to replace the existing small windows, there is another trick with curtains. Put on a curtain rail in the whole length of the wall (not just above the window) and hang on some white or bright coloured, and transparent curtains. 

Important is that you use light curtain materials, because heavy fabrics won`t be able to diffuse all the incoming daylight. Light materials don`t absorb the daylights but will work as a reflector to spread them out on the whole length of the wall. That is why the window will look much bigger and this how to get more light into your home.

1. Small windows – 2. Small windows covered with white transparent curtain

This trick can also be used for dark painted walls, if we don`t want to change the wall colour. Bright curtains create a big contrast on dark walls, and makes the room looks brighter and bigger.


11. Curtain rails

Heavy or dark curtains hanging on windows are blocking the daylight. Put the curtain rails always as near to the ceiling as possible. It does not matter if your window is a small one, because with this trick you create the illusion that the ceiling is higher, and the window is larger.

1. Curtain rail put just right above the window – 2. Curtain rail put near to the ceiling

12. Artificial light

How to get more light into your home in the evening hours? Well, the answer is simple, you can`t. In the evening hours there`s no natural daylight, so we can’t avoid using artificial light.

Some people use pendant luminaires hanging from the ceiling, but the downside of this is that these lamps direct the light only downwards. Only people underneath the lamp will get enough light and the rest of the room will be in semi-darkness, which is not ideal for any evening activity. If we choose for a pendant lamp though, then pick a luminaire that spreads the light upwards (up to the ceiling) and downwards (to the floor) as well.

1. Simple pendant lamp provides insufficient light – 2. Ceiling lamp which directs light upwards and downwards

Lighting up the ceiling is the most efficient way to make a room brighter in the evening, because from the ceiling the light spreads out in each direction (walls, floor, furniture etc.). So you rather try to use floor and wall lamps as these will direct their lights along the walls up to the ceiling.


13. Materials and surfaces

In case of a dark kitchen the most effective lightening solution is to change the splashback panels/tiles and cabinet doors to something with a brighter colour. If there is no budget for new tiles or new cabinet doors, nowadays we can buy good quality paints in most of the DIY shops (also for floor tiles!). Within few days our kitchen will be reborn and looks like new.

If we want to change the countertop as well  – because it`s dark or maybe dated -, then before choosing any material we need to check how the light falls in onto the countertop and what kind of artificial lightening will be used in the evening hours.

But how to get more light into a kitchen where there are no windows? If the kitchen has no windows or only small ones and the average natural daylight is not significant, then it`s practical to pick light coloured materials in general for walls, cabinets, countertop, and kitchen floor as well.

1. Bright kitchen with white cabinet doors and bright coloured splashback – 2. Anthracite cabinet doors with black splashback

Glossy surfaced cabinet doors and splashback panels/tiles reflect more light during day and night then matt materials. For the countertop, a matt finish would be the right decision if we want to avoid any glare on their surface.

If we decide to bring more daylight into the kitchen by installing one or more skylights above the kitchen/kitchen island, then it`s good to know that the huge amount of incoming daylight will hit the kitchen floor first.

In case of white shiny flooring unfortunately the surface glare will cause a disturbing effect during the cooking. To avoid any glare underneath the skylight or roof window, matt finishes are practical. The colour of the right flooring gets darker proportionally with the amount of incoming daylight. In other words: the more daylight falls in and hits the floor, the darker colour the floor should have.


14. Lampshades

If our floor, table, or wall lamps have lampshades, we need to know that the colour of the lampshades determines the light quality in the room as well. Dark fabrics absorb most of the lights, while white ones let them through. Huge impact can be achieved by just changing the lampshades to white coloured ones.

1. Black lampshade – 2. White lampshade

15. Crystal luminaires

Crystal lamps are very chic, sophisticated luminaires and they can give a specific sphere to our interior. Beyond their uniqueness, quality, and beauty they have one more characteristic, which is their light refraction. We`ve all looked once into a kaleidoscope and remember how the light can be altered.

This is the same effect that a crystal luminaire can create. Crystal glass reflects the light in many directions and not just in the evening (when the artificial light is switched on), but also during the day when daylight and sunlight enter the room.  

1. Opal ceiling and wall lamps – 2. Crystal chandelier and wall lamps

16. The outside

It may sound unbelievable, but the outer space does have an influence on how bright the inside space is. For example, if we live a detached house or row house with garden in the front- or backyard, it`s important to make a conscious design for the window area. In winter, the incidence angle of the sunlight is the lowest during a year.

If we have evergreen trees in front of the window, then we need to cut back some branches in the autumn so that more daylight can pass through their foliage during the autumn and enter the house. 

In case we don`t have any trees in the garden but planning to have some in the future, then leafy trees could be great choice. Their foliage provides sufficient shadow in the summer and protects the house from warming up. While during the autumn these trees lose their leaves and allow the natural daylight and sunlight into the house.

For those who want only green grass or flower beds underneath the window, they should know that the colour of grass, flowers and plants do have influence on the incoming daylight and its colour. They reflect the sunlight and daylight into the house, but they also alter the perception of colours seen in a room.

Therefore if we want to repaint the walls of a room and we have green grass underneath the window, by choosing the right paint colour, we need to take into consideration that the inside will get a light tint of green as well. This rule applies also to pavement in the garden. Shiny, bright surfaces reflect more daylight and sunlight into the house, while the dark and matt ones absorb the light falling on their surface.

1. Stone pavement underneath the window – 2. Trees in front of the window – 3. Green grass underneath the window

17. Additional wall opening

Placing large windows or creating additional openings into the wall for patio doors, curtain walls, or using a light tunnel or skylights in the roof, all these solutions will increase the amount of incoming daylight immediately.  Current market provides plenty of choice for each budget, taste, and technology. 

It`s good to know and it`s a fact that people are willing to pay even more (above the market price) for a bright and sunny property, than for a dark one. So, when we enlarge the window opening, add extra sliding or patio doors or cut a skylight into the roof, we don’t just make the living space brighter but also increase the value of the property.

There is no pro without contra however: each additional wall/roof opening – depending on the size of the installed glassed panels – affects the warming up of the house. In order, to create a liveable and pleasant atmosphere in the house, the external or internal shading solutions are key.

From the aspect of natural daylight maybe the best solutions are the north facing roof windows, skylights, and light tunnels.  As we know there is no sunlight coming from the North, so we don`t have to be afraid of the warming up effect. Windows facing to the North provides constant natural daylight into the house, no matter if it`s sunny or overcast outside.

Larger sliding door allows more daylight into the room

Extra tip: by extending your house with a covered terrace, extra living space or an inner garden, it`s worth to design the extension with a glass roof with a minimum slope of 5%. Glass roof allows huge amount of natural daylight into the inner space and you can save on the energy costs as well by turning on the artificial light in the late hours.

Of course, glass costs more than brick, but it`s a good investment once you`re willing to sell your property. If you want an extension with sliding or folding doors instead of brick walls, they will also let more natural daylight into your house but it`s important to make them burglar proof.


We`ve reached the end of my brightening tips and tricks. Hopefully, you could find some great ideas about how to get more light into your home and have a better understanding on the important role that daylight plays in our life and the effects it has our way of living.

To give a cosy sphere to your home, let as much sunlight and daylight enter your home as possible, and to stay healthy don`t forget to go regularly outside to enjoy the fresh air – even if it`s freezing.


Filed Under: Blog

How to Get More Light into Your Home? -Part 1

October 26, 2020 by E-Dsign

17 Best Ways to Let More Light Entering Your Living Space


How to get more light into your home?

Now that autumn has arrived, the number of gray and rainy days gets more and longer. The amount of daylight becomes shorter as December is nearing and we miss the warm sunny days. The Sun’s path has changed according to the season and that affects the length of daytime and the amount of daylight received.

To demonstrate how the length of the daytime can differ during a year, the below study was made for a family house in Amsterdam taken in March, June, and December:

Solar study – Amsterdam, March 2020

Solar study – Amsterdam, June 2020

Solar study – Amsterdam, December 2019


It`s almost November and pouring rain is predicted for the whole week. Today is another typical workday, we get up at 6-7 o`clock in the morning and see that outside it is still dark and hear the raindrops falling. We feel cold, turn on the lights and check the thermostats. It shows “only” 19 degrees inside… and we wonder why we feel cold at the same temperature in the autumn than in the summer…

We dig out the warm clothes from the wardrobe and getting warmed up for the new day with the first cup of warm tea (and many to come). Some of us turn on the heating as well in hope of getting in a better mood, but against the warm room and extra blanket we still feel a bit depressed, missing the warmth.

From psychological aspect this kind of feeling uncomfortably cold and light depression are known to the concept of light-warmth and darkness-cold, which is intrinsic to the human psyche (Christine Warman, Hinderwell, North Yorkshire, UK).

The more light our eyes absorb, the warmer we feel. If there is insufficient daylight, we feel the same temperature colder in the autumn and winter, then in the summer. The lower level of daylight and sunlight can lead to the well-known seasonal affective disorder (SAD), which is related to the changes in seasons. We`ve surely heard about the SAD-lamp (a light therapy with 10.000 lumens or even higher) and that it can ease the symptoms of seasonal changes, increase the energy levels, and make people feel better about life and themselves.

There is no life without sunlight and no well-being without daylight.


So the most efficient way to improve our indoor comfort – instead of turning on the heating – is to provide more light during the day. On a cloudy day we can turn on the light or purchase a SAD-lamp. But to avoid any disappointment, we need to know that people do prefer natural daylight to artificial light and therefore artificial light can never be equal to natural daylight and sunlight.

If our aim is to get in a better mood, than turning on the light can make some improvement, but it will never achieve the same result as spending hours on the fresh air. Even if it`s chilly and overcast outside.

Light is the first element of design; without it there is no color, form, or texture.

Thomas E. Farin


How to Get More Light?

In case we don`t want to use artificial lighting (saving on electricity costs) we can consider the solution of increasing the amount of natural daylight entering the room.

It doesn`t matter how gorgeous a newly built or renovated house is or how expensive the furnishing was, if there is not enough light in the living space. Without light the colours and materials lose their meaning and we won`t be able to create a cosy, warm and inviting home. Through the next 9 brilliant tricks you can learn how to fix the interior mistakes and to brighten up your home by getting more light into the space.

1. Mirrors

First of all, it`s a misunderstanding that mirrors can make a room look bigger. What they really can do, is to brighten up the space by reflecting the incoming light. That`s why we have the feeling, that a brighter room looks also bigger. If we use mirrors they should be placed near to the windows or artificial lights to reflect as many lights as possible. White walls reflect the incoming light in many directions, while mirrors reflect the light towards the middle of the space.

Picture b) and d) show how mirrors alter the angle of the light incidence, while on picture a) and c) we see that natural daylight – comparing with mirrors – is the one that makes a room obviously brighter.

Daylight reflection on white walls: a) glossy floor and no mirror; b) glossy floor and mirrors; c) matt floor and no mirror; d) matt floor and mirrors

2. Glass panel doors

Having a dark hallway or a room without any natural daylight, glass panel doors allow the light to flow into the dark spaces as well. Using clear or frosted glass doors doesn`t even matter. In cases we do need privacy – thinking about bathroom, toilet, or bedroom – the best choice can be the transom windows above the door.

Transom window allows more light and also air (if they can be opened) at the same time into the room, but no insight. For small spaces, another clever idea is to replace the room dividers with clear or frosted glass panels: for example, in walk-in showers or walk-in-closet.

Transom and glass panel doors

3. Painting white

The biggest and fastest way to lighten up any room is by painting the walls and ceiling to white. White walls and ceilings reflect the most lights in a space. Using white cannot go wrong and this is the only way to make a room to look 100% brighter and bigger. On the other hand, a white room may look sterile and cold. If we want to avoid the total whiteness, then let`s try some colours.

Light colours can also bring not just life into the room but more light too. A light gray, light blue or light yellow can work perfectly and will reflect the natural daylight, but only in that case if we pick the right tint. For example, in the Scandinavian countries natural daylight has a light tint of gray in it, while in Mediterranean countries a light tint of blue can be seen.

This difference in perception of daylight in other parts of the world, affects how we see the colours on the wall. A “blue-gray” paint won`t look the same in Finland and in Italy.

Same blue-gray wall and glossy wood floor in Finland (left) and Italy (right)
Photo made on a very cloudy day on 22/10/2020 at 12:00 a.m.

4. Light-coloured furniture

Light-coloured furniture spread out the light in a room. By changing a room layout, furniture should be placed near to windows or to areas where the natural daylight is coming in, so that the most light hit their surface. But it`s important to know, if we want to lighten up a space, we never place any furniture under the windows. They will automatically block the light and instead of making the room brighter, it will be darker.


5. Windowsill

If the windows have a sill (inside or/and outside) a great effect can be achieved by painting them white. White sills spread more light into the house and make the room brighter. Another tip: keep the windowsills tidy and remove big plants and accessories if they may block the incoming daylight. In case there are no sills around the windows, they can be added later as well.


6. Light-coloured floors

When the sun is shining into the house the light hits first the floors. If you have a light-coloured floor (concrete, tiles, hard wood, pvc vinyl etc.), then you are lucky, because the floor will reflect the light towards the walls and the ceiling, which will brighten up the room immediately. Dark floors can reflect almost as many daylights as the light-coloured ones if their surface is shiny.

So, when your dark wood floor does not have a glossy surface, you can give a glossy lacquered layer on top of it. After that, the dark floor won`t absorb the incoming light anymore but spread them out. Extra tip: nowadays you can buy a good quality floor paints and change the colour of your floor tiles, concrete or wood floors if you want to.


7. Area rugs

If you don`t want to change the outlook of existing floor, but still want to make the room lighter, then you can also use area rugs. It`s needles to mention to choose rugs with bright colours (yellow, orange, light blue, white etc.). The lighter the colour is, the more reflection can be achieved. Bright area rugs will not just lighten up the space but also keep your feet warm (unless you have a floor heating).  


8. Panelling and wood ceiling

Paint the panelling on walls and the wood ceiling in light gray, light blue or white. With this small alteration the room will look brighter and bigger. For the ceiling, high gloss finish will be the best choice instead of the matt.


9. Accessories

Maybe one of the easiest brightening solutions is to change the colour of the accessories. If you have dark furniture, dark walls, maybe also dark floors, by simply adding bright coloured accessories to your interior will lighten up the space. You know, the brighter the colour is, the more reflection can be achieved.

If the walls have a real dark shade, a great contrast can be created by hanging family pictures or paintings in white frames on the walls (glass frames even better).  The same result can be scored by using bright pillows, blankets on dark seating furniture.


Now let`s see all these alterations in practice and check how we`ve managed to get more light into this dark living room:

Original dark room – Sofa placed underneath the window and blocks the incoming daylight

Changed seating layout allows more daylight into the room

Changed seating layout allows more daylight into the room
Image 1 of 8

As you can see, there are lots of solutions about how to make your home brighter and lighter in the overcast autumn and winter days, and for the next time I`m keeping further 9 smart and bright tricks for you.


Filed Under: Blog

How to Turn Your Living Room into a Bedroom?

September 29, 2020 by E-Dsign

Some of us may still remember how it felt to live in a 35-40 m² apartment with only one bedroom and a mid sized living room, either during the university years or as a first home owner. Though these properties haven`t got a big floor area, they can still easily suit to the urban lifestyle of 1 or 2 people.

But what if a young couple is planning to start a family and they need more space for the kid(s)? Buying a bigger property would solve their problem but a bigger flat or house could be way over their budget and living on credit sounds more scary than appealing. Or what if a family of 4 – due to the changed financial situation – needs to sell their home and move into something smaller?

Whatever reason we may have to live in a small apartment, the property`s layout and furnishing demand serious planning skills. Thanks to a well thought-out design even such a small living space can be altered easily to a comfortable and functional home for each generation of the family.

For this time I`ve picked a 40 m² apartment, where a family of 4 is living. The apartment has a small kitchen, a bathroom (both without natural daylight); a bedroom for two kids and the living room, which also serves as the parents` bedroom.


  • Living room turns into bedroom
Original apartment layout

The family doesn`t want to move into something bigger, so they were interested in the Space Planning Design to check how their living room can be redesigned and if there would be enough space for a second bedroom without moving any walls.

Through the next pictures I will illustrate two solutions for the makeover and showcase you how small changes can alter any living space.


Option 1.

Living Room Space Planning with Existing Furnishing


If we check the apartment layout, the first and most obvious fact is that the living room takes up 50% of the apartment floor area. That`s allright, because this room is where the family members meet each other, spend quality time together and where they receive guests.

Another obvious fact about the living room is that due to the size of the L-shaped sofa less storage space was left available. For this family this room means not just the living space but it also needs to function as the parents` bedroom. The parents have chosen for a quick and easy solution by purchasing a big L-shaped sofa, which can be altered easily into a sofa bed.

The L-shaped sofa placed next to the window: blocking natural daylight and preventing adding further furnishing

There is nothing wrong with this concept, because a living room can be easily turned into a guest room if some people stay for the night and we don`t have an extra room. But in this case the situation is not ideal for the parents. They not just sacrifice their privacy but a good night`s sleep exists only in their dreams. Each family member deserves the private bedroom or at least a real bed with quality mattress. All of us know how a day starts after a bad night`s sleep…

The living room has two entry doors

If we further analyze this room, we can see on the floorplan that the room has two doors: one is opening from the hall and one from the kids` room. The two doors cut up the entire wall into small segments, which makes the furnishing and storage even more difficult.

One of the basic rules in Space Planning is to know that living spaces (bedroom, kitchen, living room etc.) tend to serve more than one function. We can have dinner at the dining table in the kitchen or in the dining room if we have one, but not really in the bedroom sitting on the sofa while watching tv (although this is tempting for a lot of people). If a living space tends to serve several tasks, then we have to create different functional zones for each activity and secure the walking path around and between the zones.

If we go back to the original floorplan, we see that not only the living room but also the kids` room has two doors. The problem is still the same, the extra door divides the wall and occupies the space for extra furniture.

Luckily, this issue can be solved very easily: just need to remove the extra door between the kids’ room and the living room and to wall up/build in the door opening. Having only one door in the room makes it possible to change the furniture layout.

By moving the sofa to the opposite wall, the natural daylight coming through the windows won`t be blocked anymore, and we achieve a long even wall for more storage.
On both sides of the sofa there is enough space for extra side tables or plants.

If we don`t have a budget for serious alteration or to buy new furniture, this simple solution is not just cost efficient, but makes the living room more functional and later we can purchase new furniture as well.


Option 2.

Living Room Space Planning with New Furnishing


If we do have a budget for new furnishing, then with the next solution we can create a multifunctional living room without moving any walls.

New living room layout design

Yes, this is still the same living room. It hasn`t been get smaller or bigger, the size remained 20.35 m². However it looks more spacious and serves more functions than before the alteration. Basically the quality change is due to the maximal effective usage of the space. Storage problems are real challenges for families and home owners, specially in case of such a small apartment it is obvious that every square meter counts.

To provide enough storage space, a new wardrobe has been placed in the living room. This item of furniture gives you not just enough storage space for the clothes but actually it can also work as a room divider. We can easily enter the living room from the hall and the wardrobe doors can be opened as well. On the other side of the wardrobe a sleeping nook has been created for the parents, so they can forget the “comfort” of the old sofa and finally sleep well in their own bed.

Extra tip: with some wallpaper we can cover the back of the wardrobe if it`s not eye-catching.

The other half of the room is still functioning as the living room. Since the sleeping issue has been eased by adding a sleeping nook, there is no more need for the big L-shaped sofa. Small seating items are more functional and also provide enough seating for the family members and guests. During the layout design not just the walking paths have been taken into account but also more storage has been created.

Space-planning-nappali-atalakitas-utan-7
Space-planning-nappali-atalakitas-utan-5
Space-planning-nappali-atalakitas-utan-2
Space-planning-nappali-atalakitas-utan-4
Space-planning-nappali-atalakitas-utan-3
Space-planning-nappali-atalakitas-utan-1
Space-planning-nappali-atalakitas-utan-6

This living room makeover showcases how a well thought-out Space Planning can achieve big changes and maximises the effective usage of the living spaces.

Finished Design for the 40 m² Apartment

Space-planning-incorrect-correct-design_Space-planning-incorrect-correct-design-18
Space-planning-incorrect-correct-design_Space-planning-incorrect-correct-design-19
Space-planning-furdo-3
Space-planning-furdo-2
Space-planning-konyha-eloszoba-3
Space-planning-konyha-eloszoba-1
Space-planning-konyha-eloszoba-2
Space-planning-gyerekszoba-1
Space-planning-gyerekszoba-2
Space-planning-nappali-atalakitas-utan-1
Space-planning-nappali-atalakitas-utan-4
Space-planning-nappali-atalakitas-utan-7

If you`re also facing with layout difficulties in one of your living areas, just send me a Space Planning Design request and it would be my pleasure to help you!

Filed Under: Blog

How do I choose a paint colour?

June 11, 2020 by E-Dsign

Are you ready to give your room a makeover but have no idea which colour combination to choose? Just look around your surroundings to get inspired. There are lots of great colour combinations waiting to be discovered in places you may not think about…for example in museums or in the local sweetshop.

The following moodboards have been sweetened by tiny delicious petit fours…


Classic white

Cool blue

Simply yellow

Pinky yellow

Colour boost

Green and lilac

Light blue

Good coffee

Filed Under: Blog Tagged With: Colour combination, interior design colour, Moodboard

Primary Sidebar

What`s Your Biggest Interior Design Challenge?
Send

Recent Posts

  • How to design a master suite with a walk-in-closet?
  • Where should you position your bed?
  • 7 Design Rules You Need to Know
  • How to Get More Light into Your Home? -Part 2
  • How to Get More Light into Your Home? -Part 1

Archives

  • June 2021
  • May 2021
  • March 2021
  • November 2020
  • October 2020
  • September 2020
  • June 2020

Categories

  • Blog
  • Facebook
  • Instagram
  • LinkedIn
  • Pinterest

Footer

About

Welcome to HomeMood, an Interior Space Planning website made for home lovers who want to get the most out of their interior and give personality to their homes.

Latest projects

penthouse entry
penthouse entry
penthouse entry
penthouse kitchen&dining
penthouse bedroom
penthouse bedroom
penthouse master bedroom
penthouse ensuit
penthouse ensuit
penthouse ensuit

From the Blog

How to design a master suite with a walk-in-closet?

Where should you position your bed?

7 Design Rules You Need to Know

  • Facebook
  • Instagram
  • Linkedin
  • Pinterest
  • Privacy Policy

Copyright © 2025 · HomeMood Interior Space Planning